Why Do You Need To Know How To Adjust Binoculars?
When it comes to bird watching projects, it’s important that you know How to Adjust Binoculars. You can observe wildlife and birds without using a binoculars, but you’ll need one if you want to see more detail.
The best bird watching binoculars doesn’t have to cost you lots of money, but it should be able to magnify birds enough for you to identify them. Many 8×42 or 7×35 power binoculars are budget-friendly and good for bird watching.
So, before going to how to adjust binoculars, you must know how to choose the right binoculars for your needs first.
Is Binocular Adjustment Necessary When Using Cheap Binoculars?
Binocular adjustment is necessary when using both cheap and expensive binoculars. Proper adjustment ensures optimal viewing experience, comfort, and reduces eye strain. Adjusting the interpupillary distance and, if available, the diopter settings allows for a clear, single image and accommodates individual vision differences.
Though cheap binoculars may have limited adjustment options, making necessary adjustments enhances the clarity, focus, and comfort of your observations. Consult the manufacturer’s instructions for specific adjustment mechanisms and procedures.
They should comfortable and easy to use for you. You can buy binoculars through online stores, sporting goods stores and catalogs. Many binoculars under $200 will work perfectly fine, if you adjust them properly.
How To Adjust Binoculars When Birding
Binoculars act as an extension to your eyes. First, you’ll use your naked eye to find the birds that you plan to observe. Once you’ve detected their movement and able to view the wildlife, you’ll use your device to look at the details of the bird’s “field marks.”
Since our eyes are different, you should calibrate your binoculars before you raise them for your eyes.
How to Calibrate Binoculars
We hope that you are already be familiar with binoculars terms, if not, learn more about them in this Type of Binoculars – What to look for.
Step 1:
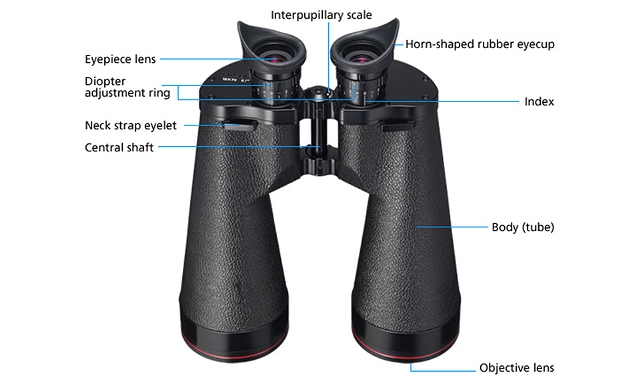
Binoculars attach at the center, which is between the two large “barrels,” enabling its eyepieces to fit the width of the user’s eyes. You should pivot these hinged barrels to enable you to see one single circled image instead of a double image as you look through them.
If the barrels are close together, that’s as they go and you’re still seeing two images, you should consider finding another pair. The distance between these two eyepieces is referred to as the “interpupillary distance.”
If you’re seeing two images, you should realize it’s too large. The number that’s on the (HINGE POST) (ANGLE) will be same to the same to user’s eyes, regardless of the model of binoculars you use.
Step 2:
You must calibrate your binoculars to accommodate both of your eyes since they have a slightly different vision. The purpose of calibrating your binoculars is to bring each of the eyepieces into a sharp focus. Many binoculars models feature a focusing wheel at their center.
Its purpose is to adjust the focus of the two eyepieces (which is what you’ll see with both of your eyes) at the same time. Most brands of binoculars offer you a separate “diopter” adjustment, which lets you turn or focus one eyepiece separately, to accommodate your eye’s differences.
Depending on the type of binoculars you use, this adjustment can be found on the right or left eyepiece (in most cases it’s usually right). On the eyepiece, you’ll find marks that are similar to these symbols (+ … O … -).
Note: the rest of these instructions will assume that you’ll be using a binoculars that has a right-eye (diopter adjustment). If you’re using a binoculars that uses a left-eye adjustment, you should reverse the side of the device indicated.
Step 3:
Turn the center (focusing wheel) towards the right, that’s as far as it can go (if you’re using an external focus binocular. Turn the (diopter adjustment) adjustable eyepiece counterclockwise, moving it as far out from the body as it’s possible.
Both of the eyepieces should be out of focus. Stand around 30 feet from a sign (street signs usually work well). With both of your eyes open, you should turn the (center focusing wheel), that’s until the lettering comes into a sharp focus.
To ensure you get the sharpest image, you should make sure you turn the center focus wheel to the sharpest focus and then back again.
Step 4:
The next step is covering the left barrel while keeping both of your eyes open. You should then turn the right eyepiece in a clockwise way to bring the lettering into focus. Again, you should turn the eyepiece way beyond its point of sharp focus and then back again to get the sharpest image.
Make sure you leave the center focus wheel in the same position you left it in the third step. Uncover your left barrel. Your binoculars should now be in perfect focus and well calibrated to your eyes. Remember the position, which the right eyepiece is set.
It will not have changed, that’s unless your vision changes. You can place a masking tape around the device’s eyepiece to ensure it’s not turned. Going forward, you will only use the center focus wheel for adjusting both of the eyepieces.
Note: this exercise will make wildlife watching to be among the best experiences. That means taking the time to teach users this important skill is passing on knowledge.
For younger students, it may be best to keep the right eyepiece at the center (not adjusted). Most young users have little or no need to independently adjust the eyepieces. It reduces confusion for them, but the final decision is up to you.
Spotting Scopes or Binocular Good For Birding and Bird Monitoring
For general bird observation, binoculars are usually among the most useful tools.
On the other hand, spotting scopes are the best for long distance viewing, for example, when monitoring an eagle nest or identifying shoe birds. The following are basic tips for choosing a scope that suits your needs.
Size and Power
Spotting scopes are available in three sizes with a range of powers. The most popular ones are the zoom lenses. Midsized and compact scopes fall in the 12-45 power range. The full sized ones are in the 20-60 power range. Most of the best range binoculars fall into this category.
For average and beginner birders, the best mid-sized or compact scopes are the best option. They are less costly, lighter weight and easier to use. The type of binoculars that can be considered here are 8×42 and 10×40 binoculars, you can find out more information about these two types of binoculars in the article linked here.
However, their optical may not be as good as the smaller scopes, which their price sometimes reflects.
Any scope will be excellent if it has “HD” or “ED” lenses, which means you should consider them if you have the money. These lenses reduce the chromatic aberration (colors) or blurriness around the edge of the user’s viewing field.
Which size is best to choose?
Most birders will mostly not use the 60x end of even their expensive and large scopes as a result of the narrow range of vision which is at this high end of the magnification range, heat waves effects, shaky picture resulting from even slight winds and viewing through precipitation.
Scopes are also measured by the objective lens’ size (the lens found at the opposite end from the eyepiece). It’s a measurement of the LENS DIAMETER in (millimeters) ((60mm, 50mm, 80mm,).
The larger it is, the brighter the view you’ll get through the scope. That means an 80mm objective lens will be brighter than a 72mm (on the same power scope). A scope or binocular 60 mm will also be brighter than a 50mm binocular or scope.
Retractable Eyepieces and Eye Relief
All binoculars and scopes are given an (EYE RELIEF) rating. The higher the number, the better it will be for you to see through the optics. If you’re using glasses, you should consider buying a scope with the highest number of eye relief (usually above 15 or 16) possible.
That will to provide you with the widest (FOV) field of view. Retractable eyecups are usually extended by people who don’t wear glasses to keep their eyes at an optimal distance from the device’s lens.
Lens Hood or Shade
A lens hood (retractable) on the objective (FAR END) lens of a spotting scope reduces lens glare during hot days. When in low light conditions, it should be always retracted.
Tripods and Window Mounts
Since scope viewing is always at a higher magnification than when using binoculars, having a solid base is important. You should buy a heavy and solid tripod to minimize the scope vibrations when you’re viewing. The best tripod will cost you around $100 and above.
On the other hand, a window mount is less expensive at ($25-$45) and is a good tool if you’ll be viewing birds from your car. Remember cars make good blinds for bird observation.
Buy the Best Binoculars and Scope to Get the Best View
Overall, you will get what you pay for, unless it is a promotion. In that regard, even with a perfect adjustment, your binoculars and scope will only be as good as the parts used to make them.
We hope that you found this guide to be quite helpful, and you will get the best binoculars and scope. If you have any tips and tricks, please do not hesitate to share them in the comments below.